Microchipping is a quick and effective way to provide your dog or cat with permanent identification that can help ensure they’re returned to you if they ever get lost. Understanding how to properly inject a microchip is essential for both safety and effectiveness. In this guide, we’ll walk through the microchipping process step by step, explain proper placement, and share tips to ensure your pet’s comfort and long-term chip performance.
Before You Start the Microchip Implant
- Scan the animal prior to chipping. Use a microchip scanner like the Pocket Hero™ ISO Microchip Scanner to check for an existing microchip before proceeding. Scan several times over the shoulder blades to detect if a microchip has already been implanted. Make this a habit!
- Scan the new microchip you will be implanting to verify the microchip number.
The Microchip Injection Site
When it comes to where do you inject a microchip, follow these steps:
- Locate the shoulder blades (scapulae bones) on the back.
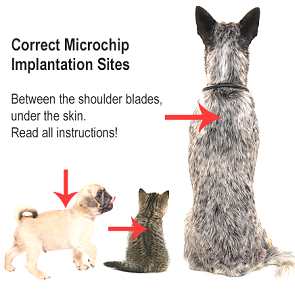
- Locate the midpoint between the shoulder blades: If you gently massage downwards towards the spine area, you will feel a slightly rounded strap of muscle that runs left to right between the shoulder blades. This is called the trapezius muscle. You do not have to put the chip into the muscle. This is simply for location purposes.
- If you draw a line from one shoulder blade to another, your injection site on the dog or cat’s back would fall just below this line. When the needle enters the skin, it is aimed forward and down with the needle pointing toward the animal’s head. This is the typical injection site used by veterinarians.
You can microchip puppies or kittens as early as five to eight weeks of age. On any age dog or cat, the chip should be deposited deep into the subcutaneous tissue. The chip will secure itself into place within a week or so, and you should have no problem with movement. If you do experience migration of any kind, this means the chip was injected too shallowly, so make sure you go deep under the skin.
You may feel a small lump after implantation, similar to what may occur after a vaccine. However, this will subside and then you should not be able to detect the chip with your fingers. If you can feel the chip after a couple of weeks, this is another sign that you have not implanted it deeply enough.
How is a Microchip Injected
- Prepare the site for an injection by wiping with alcohol or Betadine. To prevent stinging, allow thirty seconds for alcohol to dry.
- Form a “tent” of skin by pulling the skin tissue upwards above the injection site.
- The syringe is ready to go. Do not pull the plunger back.
- Pull the protective needle cover straight off, do not twist.
- Insert the needle at the base of the “tent”. Make sure the sloped part of the needle, which is called the bevel, is facing up. Enter at a 45 degree angle (approximately) from the surface of the back.
- Enter needle fully, until the hub comes into contact with the skin. For small animals: Depending on the breed, it may not be necessary to insert the needle this far, but you must get the entire bevel into the pup or kitten. Note: The BuddyID® Microchip mini needles (15g) are much smaller than needles you may have used in the past. They enter the skin very easily. Make sure that you do not push too hard and go through both layers of skin in your ‘tent.’
- Slowly depress syringe plunger. Do not begin to withdraw the syringe until the plunger is totally depressed, allowing the plunger rod to clear the chip from the needle. If using a BuddyID® ISO Microchip, continue until you hear and feel the Click Finish™ which is a special feature on the BuddyID® and ProID® microchip syringes to let you know by sound and feel that you have delivered the chip properly. Do not begin to withdraw the syringe until the plunger is totally depressed.
- Apply pressure to the injection site using your thumb or finger as you withdraw the needle. Gently massage the area close to the injection site.
-
Give the syringe a little twist or twirl – BEFORE withdrawing the needle to make certain there is no remaining contact between the needle and the chip, then withdraw the needle.
- Scan the implanted microchip again using your microchip scanner and record the microchip number on the pet’s health record.
Microchipping your dog or cat is a simple yet vital step in safeguarding their future. When done correctly, this quick procedure provides lifelong identification that greatly increases the chances of a lost pet being reunited with their owner. Always follow best practices for proper placement and aftercare, and be sure to register the microchip with your contact information on the BuddyID® national microchip registry. With millions of pets reunited each year thanks to microchips, it’s one of the most reliable tools in responsible pet ownership and veterinary care. Questions about microchips? Call our Animal Care Specialists at 800.786.4751.
LEARN MORE:
Microchip Tips
Is there a national database for pet microchip? How do I register my pets microchip? Don't risk losing your pet because of a forgotten microchip registration. Follow these tips for microchipping your dog, cat or horse.


Do I Need to Register My Pet’s Microchip: The Importance of Pet Microchip Registration
What if a microchip is not registered? A cat or dog microchip provides life-time identification for pets, but only when the number is registered with a microchip registration center listing you as the owner.
Cat and Dog Microchips: How Microchipping Can Save a Pet’s Life
What does a microchip do to your pet? What does it mean when a microchip is not registered? What does putting a chip in your pet do? Learn about what is a microchip and how it can help protect your pet.
How to Microchip a Dog
A how-to video showing how to microchip a dog and demonstrating how to use a microchip scanner.


Written by: Shelley Hexom
Content Manager
Shelley Hexom is Revival's Content Manager and helps develop educational animal health resources. A three-time Emmy® Award-winning news anchor, Shelley works with Revival's Director of Veterinary Services, Dr. Marty Greer, Doctor of Veterinary Medicine, to help create useful and easy-to-understand articles, videos, and webinars. Shelley received her bachelor's degree in Mass Communications from Winona State University in 2002. As a pet owner, Shelley enjoys time with her Boxer mix, Sally. Shelley has been part of the Revival Team since 2016.